Each and every beginner or an intermediate in the field of ethical hacking or cyber security is facing problem in what? In the ‘Top 10 things to do after installing Kali Linux’. So, here I am back after the official release of Kali Linux 2019.1 by the offensive security group. I will be Heading towards a step by step guide on ‘how to configure Kali Linux after a completely freshly installation’. So, you do not need to go anywhere in search of any queries like - The top 10 things to do after installing Kali Linux on your computer, 10 things to do after installing kali linux, top 5 things to do after installing Kali Linux 2018.3, 10 things to do after installing Kali Linux 2019, important things to do after installing Kali Linux and what to do after a fresh install of Kali Linux.
Top 20
things to do after installing Kali Linux? Top 15 things to do after installing
Kali Linux? Really Difficult? Why?
I really can’t understand any newbie who has entered in the
field of Ethical Hacking/Cyber Security that why do they want to go on for
configuring Kali Linux after installation in their virtual machine for Top 20
or Top 10 things. Whereas it is just
possible to setup Kali Linux in 10
simple Steps. Even people go on searching for silly things like ‘null byte
10 things to do after installing Kali Linux’ where people are just wasting
their time in configuring bash alliasis, installing terminal multiplexer
which
is not that important for beginners.
Top 10 important things to do after
installing Kali Linux
So to overcome every problem on the 10
things to do after installing Kali Linux follow the steps given below :-
Step 1: Configuring Screen Resolution | Screed
Display in Kali Linux.
When we have
just finished the installation of kali Linux in our virtual environment, we get
a very small screen display. This screen display is not suitable to carry out
our lessons in Kali Linux. So, we need to configure it according to our regular
screen resolution.
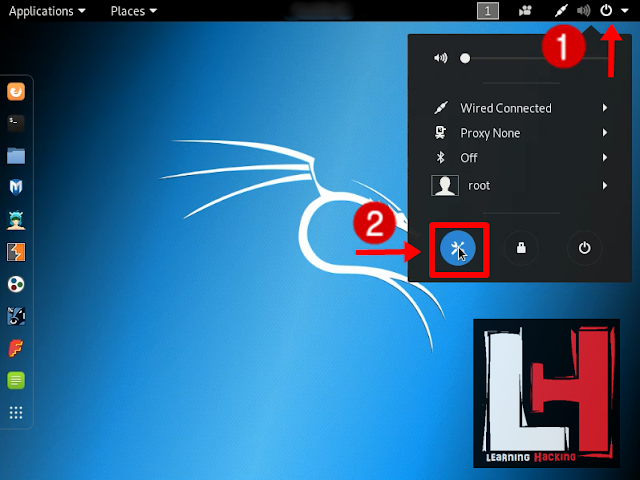
To adjust
the screen resolution we need first need to go to the power button on the top
right corner of the screen and select the setting button which is at the
bottom.
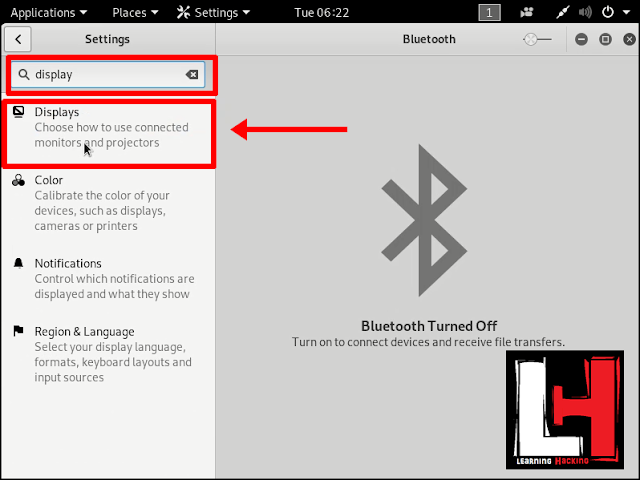
Now as the
settings open we need to type “display”
in the search box and select the first option named “Displays”.
Now you need
to go to the resolution option at the right side and select 1920x1620(16:10)
option.
So you are
set with a good display to work out a few steps in your kali linux machine.
Note: This screen resolution is inappropriate. We have taken it a bit bigger so
that we can install vmware tools and set our display properly according to the
best fit of your computer’s screen display automatically.
Step 2: Configuring
Sources.list
Now we need
to configure our sources.list file
which is in the/etc/apt/ folder in our kali linux machine’s root directory. We
need to configure/edit our sources.list file is just because without editing
this file Kali Linux is just a scrap and will
hinder in every process of installing any dependencies or packages or tools.
To configure the sources.list file we will have to to go to the
/etc/apt/sources.list destination. To edit the file we will use a text editor
named leafpad which comes installed with Kali Linux Machine. To do so type the
following command in your terminal :
leafpad /etc/apt/sources.list
Now open
your Firefox browser and check for
the tab named “kali Docs” and click
it.
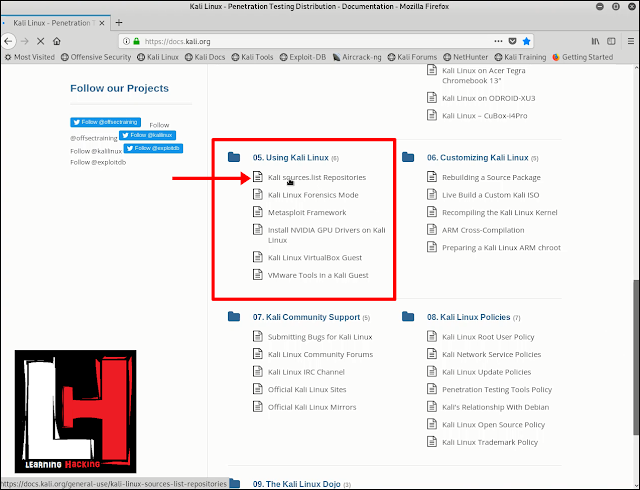
Now as the
webpage appears scroll down and in the 5th
column and open “kali sources.list
repository”.
Now copy the link given in the 3 different
boxes in the web page and paste it
in different line in the leafpad editor which you have opened. After
pasting all the 3 links present simply save
the file and exit.
So, you have
configured your sources.list file in you Kali Linux now.
Step 3: Installing vmware tools
This is the must
do step while setting up any Kali Linux machine. Installing vmware tools in
Kali Linux gives you access to directly
transfer a file from your host machine say, windows to the virtual machine
Kali Linux. In other words it will enable a drag and drop feature for copying
and sharing of file rather than sharing through pendrives. Vmware Tools also
gives stability to virtual machine, which allows the Kali Linux machine to adjust the screen resolution too. To
see the effects of vmware tools, just install by the steps given below :-
Go to the Player button > Manage > Install
vmware tools.
Now it will
prompt you confirming that you want to install vmware tools. Just select “Install”.
Now at the
top of the screen it will show vmware tools. Just click on it and select “view
the files”.
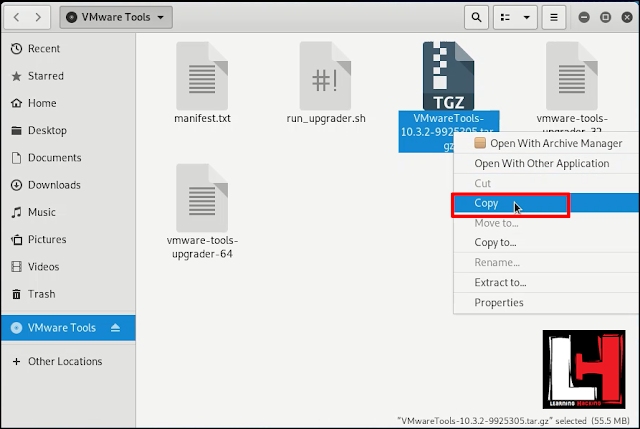
After this
you will get some files along with a tar.zip
file. Almost appearing as a zip file. Just copy it form there and past
it onto your desktop.
Now open the
zip file and you will see a folder, right click on it and select extract.
After
extracting it to your desktop just simply open
the folder and within the folder
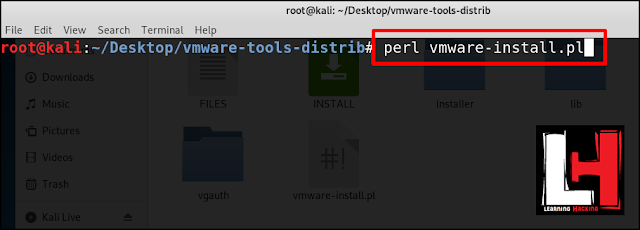
right click and select open in terminal.
Now when the
Kali Linux terminal appears just type
perl vmware-install.pl
Now just press enter and wherever it says [yes]
or[no] type yes in the terminal and the
vmware tools will be installed in the Kali Linux virtual machine.
To get the
immediate effects of installing vmware tools just restart your Kali Linux machine.
Step 4: Updating and Upgrading
kali Linux
Updating and Upgrading Kali Linux is
very important.
Updating your Kali Linux machine makes
is fully patched and updated with the updated dependencies and packages.
Whereas upgrading you Kali Linux machine makes all the tools up to date by
downloading and installing all the new
versions of the tools. To update and Upgrade your Kali Linux machine just
type the following commands in the terminal.
Note: This step might take a lot of time as well as a lot of mobile data. So,
it is recommended to use a faster internet connection speed.
apt
update && apt full-upgrade
Step 5: Installing chromium- a
web browser
Installing a
web browser is really important because for everyone Firefox just sucks!! And to use google chrome in Kali Linux is not
recommended by many users as well as professionals. So, installing Chromium is
a must because it provides a similar
interface as that of Google Chrome and maintains
our privacy at a higher level as that compared to chrome. To install
Chromium in Kali Linux just type the following
command in the kali terminal :-
apt install chromium
Note: We will be installing tor browser in the next post because at first
everyone requires a normal browser with a faster speed.
Step 6: Adding x32 bit architecture
support
Adding x32
bit architecture support is a must in Kali Linux because many tools in Kali Linux are based on x32 bit architecture failing
which they won’t function or perform as
they are expected to. To install x32 bit architecture support in Kali Linux
type the commands given below :-
dpkg –add-architechture
1386 (press enter and again apt update in your
terminal)
apt update
Step 7: Installing Atom – a code
editor
Installing a
code editor is really important in Kali Linux and when it comes to code editors
like atom when we can install additional
features in it for advance uses it becomes a very important need. Atom code
editor provides everything that a
programmer needs to do in a single software which is far better than installing
and using multiple softwares for just a single task. To install atom code
editor in Kali Linux enter the following commands :-
sudo
add-apt-repository ppa:webupd8team/atom
sudo
apt update; sudo apt install atom
Now, atom code editor will be installed in your kalio linux machine.
Step 8: Setting up a low privileged user (Non-root user)
Setting up a
low privileged user is also very important because many important tools
including tor browser will not work if
you are using it as a root user. Adding to this, anyone who has just
started in the field of learning hacking would not link to get hacked because
if you are logged in as root and get
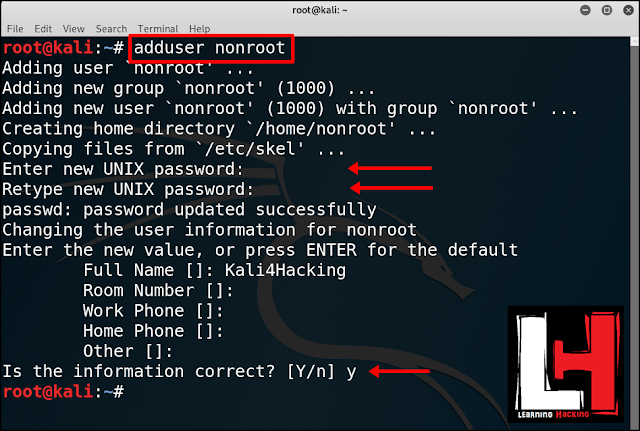
hacked then all your work will be messed up. So, to setup a low privileged
user in you Kali Linux machine type the following commands :-
adduser (username)
Step 9: Changing default password & ssh keys
Changing
default password of the ssh keys is an important work of securing your system.
As, Kali Linux is installed the ssh keys are always same in all the Kali
machines which can be used in exploiting your newly installed Kali machine. So,
inorder to change the default password of the ssh keys, just type the following
commands in your terminal :-
Move the default Kali ssh keys to a new folder:
cd /etc/ssh/
mkdir default_kali_keys
mv ssh_host_* default_kali_keys/
This will move your default keys to the new folder...
Regenerate the keys:
dpkg-reconfigure openssh-server
Creating SSH2 RSA key; this may take some time ...
Creating SSH2 DSA key; this may take some time ...
Creating SSH2 ECDSA key; this may take some time ...
insserv: warning: current start runlevel(s) (empty) of script `ssh' overrides LSB defaults (2 3 4 5).
insserv: warning: current stop runlevel(s) (2 3 4 5) of script `ssh' overrides LSB defaults (empty).
Verify ssh key hashes are different:
md5sum ssh_host_*
Compare new key hashes to the hashes below :-
cd default_kali_keys/
md5sum *
b9419ea3a8fff086c258740e89ca86b8 ssh_host_dsa_key
f9a5b57d7004e3740d07c5b037d15730 ssh_host_dsa_key.pub
58e49e0d7b24249c38db0c9cf595751b ssh_host_ecdsa_key
597c83fabf3c1e4f2c7af74af05ac671 ssh_host_ecdsa_key.pub
cc0d92036bb86797bed354338faa7223 ssh_host_rsa_key
cc9ddc90b891b5251ed4ea8341495e84 ssh_host_rsa_key.pub
Step 10: Installing Git
Git allows
us to gitclone and download any package more effectively and easily from thee GitHub
repository/directory. To setup git in Kali linux type the commands in the
terminal :-
apt install git
Final
Notes:
So, you are
all set for your new Kali Linux machine. Like a country is not complete without
its army similarly you need some tools in Kali to make it complete. To see that
check it out here.
-Happy Hacking!!
Signing Off,
Kali4Hacking.
 Thank You for visiting our website
